Showing posts with label dessert. Show all posts

Tuesday, July 20, 2010

Inspired By Summer: Basil Cream and Strawberry Pie

Yes, I've been a little lazy about getting this post up. I blame summer. And to be fair, summer inspired it so it deserves a little reward.


I think I was first inspired to try this idea by the farmers market. The perfectly delicious strawberries and fragrant basil spoke to me. In fact, it may have been their idea. And it really is a perfect summer pie. It is light and refreshing while the basil custard surprises those who don't expect it and has won over those who were skeptical of the idea before they tried it.


I truly love this pie and am so proud of this creation. Even if the strawberries and basil ARE responsible for the idea, I'm going to take all the credit for this pie.


Basil Cream and Strawberry Pie


Pre-baked 9” Pie Shell
1 lb. Strawberries

For the custard:
2/3 cup Sugar
3 Tbsp Cornstarch
3 cups Milk
½ cup loosely packed Fresh Basil leaves
4 beaten Egg Yolks
2 Tbsp butter, cut into small pieces


To pre-bake pie shell:

Line pie dish with rolled out pastry.

Line with aluminum foil and fill with beans or pie weights. I find it works best to fill the entire pie shell to the top with your weights.

Bake on the bottom shelf at 400° for 20 minutes.

Decrease oven temp to 375°.

Remove foil and weights. Poke holes all around the shell with a fork, twisting the fork slightly as you go.

Continue baking at 375° until the inside is golden brown and the shell is fully baked. Check at five and ten minutes, using the back of a spoon to press down any spots that puff up.

Cool shell before filling.


For the pie:

Wash and quarter the strawberries. (Reserve a couple of the prettiest ones if you would like to use them for garnishing.)

Separate ½ cup of the cut up strawberries. Mash slightly. Mix with remaining cut up strawberries and set aside.

In a medium bowl, slightly beat the egg yolks and set aside until needed.

In a medium saucepan, stir together sugar and cornstarch. And milk and whisk to combine with the dry ingredients.

Add basil leaves.

Heat over medium, stirring constantly, until thick.

Once thickened, whisk about a half a cup of the hot milk mixture into the egg yolks, tempering them to prevent scrambled eggs from forming in your custard.

Add egg yolk mixture back into the saucepan while whisking, continue heating about 1 more minute while continuing to whisk the mixture.

Remove from heat and add butter, stir until melted completely into mixture.

Pour mixture thru a fine strainer to remove clumps and basil leaves.

Spread strawberries in an even layer across the bottom of the baked pie shell. Top with basil custard. Refrigerate until set, probably 4 hours is sufficient but I refrigerate overnight.

Garnish as desired with additional strawberries, bail leaves, and/or whipped cream.


Sunday, June 13, 2010

For the Winos: Fresh Blackberry Pie with a Wine Glaze

Have you noticed how amazingly good the berries are this year? I think it must be all the rain the west coast has gotten.  


Whatever the reason, the raspberries and blackberries have been better then I can remember for years. And cheap too!


This pie is simply delicious. I made it twice in one week for my co-workers and they adored it. I gave out the recipe to several people, and it couldn't be much easier to make.


So make this pie, and make it soon, while the berries are still this good.


Wine Glazed Blackberry Pie

Baked 9" Pie Shell*
6 - 6oz. packages of Blackberries (about 6 cups)
1/2 cup Water
1/2 cup Red Wine (I used Merlot. I think a Zinfandel would also be nice. Use whatever you drink.)
1/2 cup Sugar
3 tablespoons Cornstarch

*The recipe posted on tasty kitchen includes a recipe for a ginger pie shell. I used my standard pie crust recipe, the ginger just didn't sound appealing enough to me to change things up. But if it interests you, give it a try.


Pre-Bake your 9" pie shell: 

I currently do this by lining a 9" pie plate with rolled our crust. Line with aluminum foil, then fill completely with beans or pie weights. Bake at 400 for 20 minutes. 

Then I remove the foil and weights and poke holes in the bottom with a fork. 

Continue baking, poking more holes if any parts start to puff up. Bake until the inside is golden brown and the shell is completely baked.


For the Wine Glaze:

In a medium sauce pan mix together sugar and cornstarch.  Add water and wine, stir to combine with dry ingredients.


Add 1 cup of blackberries.  

Heat over medium heat until thick and boiling.

In a lege bowl stir blackberries and glaze until fruit is evenly coated.

Fill pie shell with mixture and refrigerate until cooled and set, usually 4 hours is sufficient but I generally chill overnight.


UPDATE: This pie and some very tasty looking others can be found on the Summer Fruit themed July pie round-up by You Want Pies With That?

Wednesday, April 14, 2010

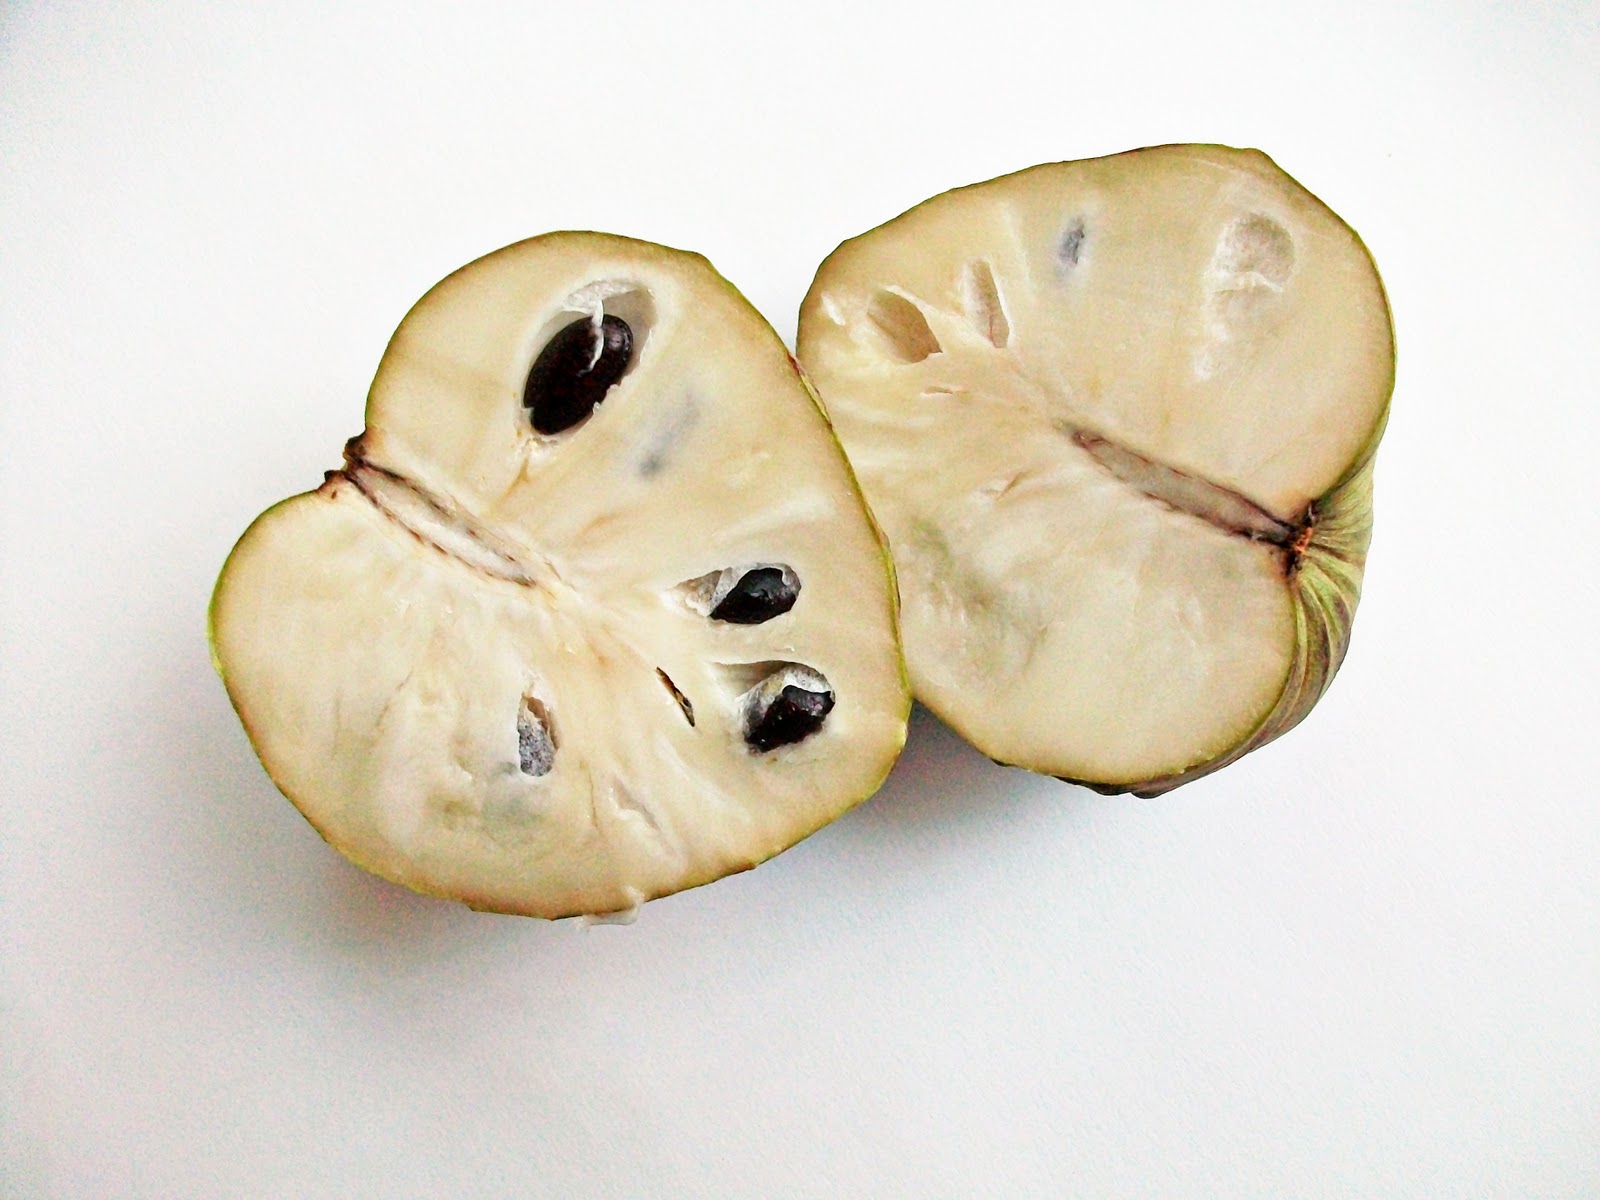
Cherimoywhaaa? Cherimoya Pie

One of my favorite things about my neighborhood is the awesome farmers market I can walk to every Sunday. I like to wander around at every single stand and make sure I get the best of whatever I am looking for. The only problem I have is carrying it all home!

This also allows me to discover new offerings. Like these cherimoyas. I had never heard of or seen a cherimoya but I thought they tasted pretty good so I was immediately determined to make a pie with them. I bought 5 big ones and headed home. (I am not even going to try and describe the flavor, I have heard everything from bubblegum to pineapple.)


I bought them a bit under ripe so I would have a few days to do my research. When they are ready to use they yield just a bit to pressure, similar to an Avocado. They also have big black seeds that are somewhat poisonous and function as an insecticide when ground- I sure was glad I did my research on this because my first inclination had been to separate them from the fruit with my food mill.


A good web search also revealed that there is a pretty standard cherimoya pie recipe floating around out there. It is similar to how I planned to go about making them into pie, using pureed fruit in a custard. The custard usually used for these involved separated the egg whites, beating them, and folding into the rest of the custard mixture in the last step. This produces a very light texture. The only change I made to the recipes I found was to add some nutmeg, because I thought this would work well with the cherimoya.


Cherimoya Pie (seems to be the standard recipe, found on many cherimoya recipe websites)


1lb. Cherimoya (about 1 and 1/2 large cherimoya for me) seeded and pureed until smooth
3 Eggs, separated
1 cup Evaporated Milk
1/2 cup Sugar
1/2 tsp Vanilla
1/4 tsp Nutmeg
1/8 tsp Salt
10 inch deep dish pie shell


Line deep dish pie plate with crust. Bake at 450 degrees for 5min. (These are the original directions, which I followed. Based on my experience I recommend a standard par bake until the inside is golden brown. Directions are provided in My Cherimoya Pie Recipe)


However you bake your pie shell, set your oven to 375 when you are done.


Whisk egg yolks, evaporated milk, sugar, vanilla, nutmeg, and salt into the pureed cherimoya.


Beat egg whites just until soft peaks form. (Do not do this until just before you are ready to use them, or they will fall.)


Fold beaten egg whites into fruit mixture until combined and no white streaks remain. Resist the urge to stir! Have patience, keep folding. When combined pour mixture into pie shell.


Bake at 375 degrees until a knife inserted in the center comes out clean. The custard will puff up and turn golden brown on top. The recipe I used said this should take about 35 min but it was much faster for me (I'm talking 15min, yikes!). This could be a symptom of ghetto oven, so watch yours closely.


The results:
Despite my concerns after it cooked so fast, this pie came out alright. The crust was a bit undercooked, hence my suggestion to pre-bake the bottom crust.

The filling came out pretty good. This pie was very light and fluffy. I cannot emphasize this enough- VERY FLUFFY. And some people really liked that. I thought the texture was fine, it was the incredibly light flavor accompanying it that I was less excited about.

Luckily, I had more cherimoya to use up so I decided to make another. This time I opted to make it using a recipe similar to a traditional pumpkin pie, in the hopes that this would produce a more dense custard with a more pronounced flavor to go along with it.


My Cherimoya Pie


2 cups pureed Cherimoya (from 2 large cherimoya)
1/2 cup Sugar
2 Eggs
14.5 ounce can Evaporated Milk
2 Tbsp Flour
1/8 tsp Salt
1 tsp Vanilla
1/4 tsp Nutmeg
1 pie shell


Pre-bake pie shell. Poke holes in the crust, line with foil and weights and bake at 375 for 20 min. Remove foil and weights, then continue baking until inside of shell is golden brown.


I used my 9-1/2" pyrex pie dish, and it worked well. This does not make enough filling for a deep dish pie, but there may be some filling left over if you use a standard 9" pie plate. Just fill it with as much as you can.


Beat together pureed cherimoya, evaporated milk, eggs, sugar, nutmeg, vanilla, salt, and flour.


Bake at 375 until a knife inserted comes out clean, approximately 25 min. The filling will puff up above the pie crust, but settles when it cools. The top will turn a light golden brown.


My results:

This pie was more dense then the original recipe produced, but still significantly lighter then a typical pumpkin pie. This must be the way the fruit cooks, but I may try reducing the recipe to one egg in the future to make the texture even more dense.

I felt this method did enhance the flavor somewhat. It still was quite light, but I was happier with what this produced. It tasted good, but I'm not sure it is as good as simply eating the fruit raw.

And at least one person compared it to cheesecake, THAT certainly isn't a bad thing.


Cherimoya Pie on FoodistaCherimoya Pie

Thursday, April 8, 2010

Summer Already? Strawberry Sour Cream Pie

I generally judge produce based on price. If it's cheap, it's probably good. So when I saw the first cheap strawberries of the year, I was thrilled. It seemed a little early, but I figured that maybe all the rain this year brought might account for that. I sniffed the packages, they smelled good and that should mean they taste good. So I bought 2 pounds.

Last year I spent about a month perfecting a fresh glazed strawberry pie recipe but never got around to actually baking them. Since it is still cool enough to roll out pie crust, I wanted to do something baked. Awhile back I had been promised some rhubarb and picked out a Sour Cream Rhubarb Pie recipe, but the rhubarb never came thru.

My interest in the sour cream pie has persisted, so I decided to make one with strawberries.

Unfortunately, I started cutting up the strawberries, and tasting them and they weren't good. They didn't taste like anything! (I still don't understand how they could smell delicious but have no flavor.)

Luckily I had purchased some blackberries the same day, and they were awesome. (Wish I had just stocked up on those. They followed the cheap rule.) I also had some frozen cherries in the freezer. I've always been suspicious of the frozen fruit pie idea but intrigued to try it, it could really open up the possibilities when things are out of season and I figured this was as good a time as any to give it a try.


First Try: Mixed Berry Sour Cream Pie

9” single crust

Filling:
2 cups sliced strawberries
1 cup frozen sweet cherries, thawed
1 cup blackberries
1 egg
½ cup sugar
1 cup or 8 oz sour cream
1 tsp vanilla
¼ cup flour
¼ tsp salt


Crumble Topping:
1/3 cup brown sugar
1/3 cup flour
1/3 cup oats
4 Tbsp butter

Roll out crust and line pie dish, use a fork to poke holes in the bottom of the crust

Line with aluminum foil and fill with pie weights. Bake 20 min at 375°

Remove foil and bake another 10-15 min

Meanwhile, combine sour cream, sugar, vanilla, flour, salt, and egg

Soften (but don't melt) butter for crumble topping. Blend with sugar, flour, and oats using a fork or you hands

Fill pie shell with fruit

Pour sour cream mixture over the fruit

Spread crumble mixture evenly across the top

Bake at 425° on bottom oven rack for 20min, then lower temp to 350° and bake until edges puff and top turns golden brown (about another 15-20min for me, but that is ghetto-oven time, so yours might take longer)

The Results:
The flavor was good, but overall this pie did not meet my standards and expectations. I chose to use an egg in the custard mixture for this pie. Looking thru the recipes some people did this to ensure it would set, and I suffer from soggy bottom crust fear so this convinced me to use an egg. Unfortunately, his produced a VERY firm custard, I was looking for something softer.

Also, the amount of crumble I used completely covered the top of the pie. I was looking for a sparser covering of crumble.

Finally, this really needed a fully blind baked bottom crust. I went for more of a par-bake. Easy fix.

The frozen cherries worked wonderfully though, and may be enough evidence for me to give a full-on frozen fruit pie a try sometime.


Luckily for me, there were lots of beautiful strawberries at the farmers market the following Sunday. And of course, in this case, I got to taste them first and pick out some really delicious fruit. So I made this pie again, adjusting according to my previous results.

My second recipe is very similar to the first one. I decided to use all brown sugar, because I thought that would be a better complement to all strawberries. I omitted the egg from the custard and scaled down the crumble. If you want complete crumble coverage, stick with the previous portion.


Second Try:
Strawberry Sour Cream Pie

9” single pie crust

Filling:
3 cups sliced strawberries
½ cup brown sugar
1 cup or 8 oz sour cream
1 tsp vanilla
¼ cup flour
¼ tsp salt

Crumble Topping:
2 Tbsp brown sugar
3 Tbsp flour
3 Tbsp oats
2 Tbsp butter

Roll out crust and line pie dish, use a fork to poke holes in the bottom of the crust

Line with aluminum foil and fill with pie weights. Bake 20 min at 375°

Remove foil and bake another 20 min or until the inside is golden brown

Meanwhile, combine sour cream, sugar, vanilla, flour, and salt

Soften (but don't melt) butter for crumble topping. Blend with sugar, flour, and oats using a fork or you hands

Fill pie shell with strawberries and pour sour cream mixture over the fruit

Sprinkle crumble mixture evenly across the top

Bake at 425° for 20min, then lower temp to 350° and bake until top turns golden brown and strawberry filling bubbles from underneath the custard

The Verdict: This pie came out awesome. I love the sour cream custard flavor with the strawberries. The only change I would make is to next time cut the strawberries into smaller chunks instead of just slicing because I think smaller pieces would be easier to eat.

Saturday, March 27, 2010

Who Knew: I Love Banana Cream Pie!

I've never really been drawn to banana cream pie. I'm not sure why but I guess I was just so uninterested in it that I assumed I didn't like it.

So then why did I make one, you might wonder. I think I just wanted to make the custard. Because I got a flat whisk and I wanted to use it. What can I say, shiny new kitchen utensils inspire me that way.

There are a bunch of slightly different ways to make custard. I pieced together a couple of different recipes to get one I likes. (It seems that in my pie studies I have gotten really opinionated about my thickeners.)

And lo and behold, I LOVED IT!


 Banana Cream Pie

9” or larger pre-baked pie shell*
2/3 cup sugar

3 tablespoons cornstarch
3 cups milk
4 beaten egg yolks
2 tablespoons butter, cut into small pieces
1 teaspoon vanilla
2 ripe bananas


In a large saucepan combine milk, sugar, and cornstarch.

Heat over medium, stirring constantly, until thickeners

Stir a small amount of hot mixture into egg yolks

Stir yolks into hot mixture and cook 1 more minute

Remove from heat and blend in butter and vanilla, let it cool a bit

Slice bananas unto the bottom of pre-baked pie shell.

Pour cooled custard over bananas

Top with whipped cream. I whipped 2 cups of cream but 1 probably would have been enough.

*I used a 9” pie, and there was quite a bit of leftover custard and whipped cream so next time I will use my 9 ½” pyrex,but I am not sure if it is enough to fill a deep dish. Of course, you could ways fill in with more bananas if needed.


Like I mentioned, I had quite a bit of extra custard and whipped cream, so I bought some of those packaged dessert cups and had a couple more days of desserts topping them with sliced banana, custard, and whipped cream.

Wednesday, March 17, 2010

St. Patty's Day Treat For Grown-Ups: Irish Car Bomb Cupcakes

A few weeks back I got the idea to make some Irish Car Bomb cupcakes, after making a Stout Chocolate Cake from Smitten Kitchen for a friends birthday. I love Irish Car Bombs and couldn't help but think cupcakes with irish crème filling and a whiskey glaze sounded pretty awesome.


Since it was so close to St. Patty's day, I waited it out and brought them in as a holiday treat for my co-workers. I wasn't sure how the whiskey glaze would go over, I even make these back-up cupcakes: the same stout cake with a simple irish crème frosting.


Both were gobbled up,but the back-up's were totally unnecessary. These Irish Car Bomb Cupcakes were a hit! They were also clearly more popular then the back-ups.


Stout Cake – makes 24 cupcakes


1 cup stout beer

1 cup/2 sticks unsalted butter

¾ cup unsweetened cocoa powder

2 cups all-purpose flour

2 cups sugar

1 ½ tsp baking soda

¾ tsp salt

2 eggs

2/3 cup sour cream


Irish Crème Filling


1 cup heavy whipping cream

1 Tbsp powdered sugar

1/3 cup Irish Crème


Whiskey Glaze


2 Tbsp Butter

2 cup powdered sugar

1/3 cup Whiskey (Irish whiskey would be most appropriate, but honestly it's not what I used)


The directions on smitten kitchen say to bring the beer and butter to a simmer over medium heat, the whisk in cocoa until smooth and cool. The First time I made this cake I didn't notice this complicated step and just mixed everything together. This time I did it correctly. I am not convinced this makes a difference. Proceed according to your own discretion. I probably won't bother to do it again.


Whisk together dry ingredients. Add eggs, sour cream and butter and beer or chocolate mixture depending on how you did it. Mix just until combined.


Fill muffin tins ¾ or a little more full. I recommend using papers because this cake is moist and can be hard to work with if it's not wrapped in something.


Bake at 350º for 15-20 minutes, until a toothpick inserted in the center comes out clean.


Meanwhile, beak together filling ingredients until soft peaks form. Refrigerate until ready to use.


When cupcakes are cool make a slice in the top with a knife. Fill a pastry bag with flavored whipped cream, using a small tip. Insert in the slot made in the top of the cupcake. Fill slowly, just until cupcake starts to spread open a bit like it might break in half if you keep going.


Simply mix together ingredients for whisky glaze with a spoon until combined*. Spread or decoratively drizzle over the cake tops.


*Warning: This glaze will smell pretty strong. The end product DOES taste like whiskey, but in a good way, so don't be afraid.


(For the back-up cupcake frosting I simply beat together 2 Tbsp softened butter with 2 oz softened cream cheese and 2/3 cup powdered sugar. I mixed this with 2 cups of the same whipped cream mixture I used to fill the Irish Car Bomb Cupcakes. This produced a very soft and light frosting. I dropped a spoonful on each cupcake (no filling) and spread it a little bit by gently pressing with the back of a spoon.)


Wednesday, March 10, 2010

C-fun's Peanut Butter Chocolate Chip Cake Mix Cookies


I have a friend I like to call C-fun. In my opinion, she has a few signature desserts. They have a theme: chocolate and peanut butter.


Chocolate and peanut butter pie, chocolate covered peanut butter truffles, and the cake mix peanut butter chocolate chip cookies I'm writing about now.


She says she likes this recipe because it's consistent, the cookies always come out good. I like it because it makes a softer peanut butter cookie that doesn't crumble into a million pieces as soon as you take a bite. Plus it is super easy because the cake mix means very little measuring.


But I warn you, they are addictive.


Peanut Butter Chocolate Chip Cake Mix Cookies


1 box white cake mix

2 eggs

1/3 cup water

¼ cup softened butter

15oz jar creamy peanut butter

12oz chocolate chips (I used ½ milk, ½ semi-sweet)


Pre-heat oven to 375º


Scramble eggs with water


Whip to combine with butter


Add half the box of cake mix and peanut butter and beat until light and fluffy


Add second half of cake mix and stir until mostly combined


Add chocolate chips and continue stirring until thoroughly combined


Drop onto greased cookie sheet by rounded teaspoonfuls (I used a medium cookie scoop)


Bake for 10-12 minutes, until done


Cool on cookie sheet about 5 minutes, then transfer to cooling rack